

In an era of increasing energy consciousness and environmental awareness, more people are turning to renewable energy sources. Among these, solar power stands out as a accessible and efficient option. One way to tap into this clean energy source is by building your own DIY solar generator. This guide will walk you through the process, explaining why it’s beneficial, what components you’ll need, and how to build and maintain your own solar power system.
Contents
Why Build a DIY Solar Generator?
A DIY solar generator is a portable power station that converts sunlight into electrical energy, storing it for later use. These generators can be invaluable during power outages, outdoor adventures, or as a supplement to your home’s energy supply. By building your own, you not only save money but also gain a deeper understanding of renewable energy systems. There are several compelling reasons to embark on a DIY solar generator project:
- Cost-effectiveness and Customization: Building your own solar generator can significantly reduce costs compared to commercial alternatives. By selecting each component yourself, you can tailor the system to your specific energy needs and budget constraints. This customization ensures you’re not paying for unnecessary features or capacity, maximizing the value of your investment.
- Educational Experience and Self-Reliance: The process of constructing a DIY solar generator provides invaluable hands-on experience with renewable energy technology. As you research, assemble, and troubleshoot your system, you’ll gain a deep understanding of solar power principles. This knowledge enhances your self-reliance, enabling you to maintain and upgrade your generator independently, and potentially inspiring further sustainable energy projects.
- Environmental Impact and Energy Independence: By harnessing solar power, your DIY generator reduces reliance on fossil fuels, directly lowering your carbon footprint. This clean energy solution contributes to environmental conservation while simultaneously granting you a degree of energy independence. During power outages or in off-grid scenarios, your solar generator can provide crucial electricity, ensuring you’re never left in the dark.
Key Components of a DIY Solar Generator
Before diving into the construction process, it’s essential to understand the main components of a DIY solar generator:
- Solar panels: These capture sunlight and convert it into electrical energy.
- Charge controller: This regulates the voltage and current coming from the solar panels to prevent overcharging the battery.
- Battery: Stores the electrical energy for later use. Deep cycle batteries are typically used in solar generators.
- Inverter: Converts the DC power stored in the battery to AC power, which is used by most household appliances.
- Battery monitor: Displays the battery’s charge level and other important information.
- Wires and connectors: These connect all the components together.
- Frame or enclosure: Houses and protects all the components.
Step-by-Step Guide to Building Your DIY Solar Generator
Now that we’ve covered the basics, it’s time to dive into the exciting process of building your own DIY solar generator. This step-by-step guide will walk you through everything you need to know, from planning and gathering components to testing and troubleshooting your system.
Step 1: Plan and Gather Components
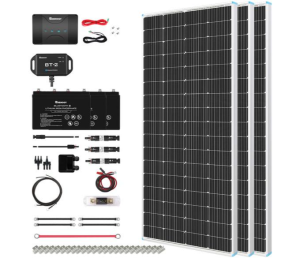
Determine your power needs by calculating the wattage of devices you plan to run. Purchase all necessary components based on these requirements, ensuring compatibility between parts. Renogy solar kits are highly recommended for their reliability, ease of use, and comprehensive packages. These kits include high-efficiency solar panels, charge controllers, and all necessary wiring, making the planning and gathering process much simpler and more efficient. With Renogy, you also get the added benefits of excellent customer support and robust warranties.
Step 2: Assemble the Frame and Install the Battery
Build or purchase a sturdy, well-ventilated enclosure to house your components. Securely place the battery inside, ensuring easy access for future maintenance.
Step 3: Connect the Charge Controller and Inverter
Mount the charge controller near the battery and connect it according to the manufacturer’s instructions. Install the inverter and connect it to the battery, following all safety guidelines.
Step 4: Install Solar Panels and Battery Monitor
Connect the solar panels to the charge controller, properly wiring multiple panels if necessary. Install the battery monitor to easily track your system’s status.
Step 5: Make Final Connections
Double-check all connections, ensuring everything is properly wired and secure. Pay special attention to polarity and use appropriate gauge wires for different components.
Step 6: Test and Troubleshoot
Conduct a thorough test of your DIY solar generator, verifying that all components are functioning correctly. Monitor the system closely during initial use, and be prepared to troubleshoot any issues that arise.
How Much Does It Cost to Build Your Own Solar Panel System?
The cost of a DIY solar generator typically ranges from $470 to $1,600, depending on the quality and capacity of components chosen. While this initial investment may seem significant, the long-term savings on electricity costs and the value of energy independence make it a cost-effective solution over time.
Tips for Maintaining Your DIY Solar Generator
Regular Inspections and Cleaning
Conduct monthly visual inspections of all components, checking for signs of wear, loose connections, or damage. Clean solar panels regularly with a soft cloth and mild detergent to remove dirt and debris that can reduce efficiency. This simple maintenance can significantly extend the life and performance of your system.
Battery Care and Monitoring
Maintain proper battery charge levels, avoiding both overcharging and deep discharges. Use your battery monitor to keep the charge between 20% and 80% for optimal longevity. In periods of prolonged storage, charge the battery every few months to prevent sulfation.
Environmental Protection
Shield your DIY solar generator from extreme temperatures and moisture. If portable, store it in a cool, dry place when not in use. For stationary setups, ensure proper ventilation to prevent overheating of components, especially during peak summer months.
Performance Tracking
Keep a log of your system’s performance, noting power generation, consumption, and any irregularities. This data can help you identify efficiency drops or potential issues early, allowing for timely interventions and optimizations.
Professional Assessment
While DIY maintenance is crucial, consider having a professional inspect your system annually. An expert can identify potential problems that might be overlooked and provide valuable advice on system upgrades or improvements to enhance performance and longevity.
Conclusion
Building a DIY solar generator is more than just a cost-saving measure; it’s a step towards energy independence and environmental responsibility. This project offers a unique blend of practical skills, scientific understanding, and sustainable living. As you embark on this journey, you’ll not only create a reliable power source but also gain invaluable knowledge about renewable energy.
Remember, your DIY solar generator is an evolving system. As technology advances and your needs change, you can upgrade and expand your setup. Whether you’re powering a camping trip, preparing for emergencies, or reducing your daily carbon footprint, your homemade solar generator stands as a testament to the power of individual action in the face of global challenges.
By harnessing the sun’s energy, you’re not just illuminating your home – you’re brightening the path to a more sustainable future. So, roll up your sleeves, gather your components, and let’s build a cleaner, greener tomorrow, one DIY solar generator at a time.